Getting Started

Optimize Your GPS Reception


Track Mode & Selection

You'll need to set the track mode and track selection before you start recording a session. Go to the main Setup screen, which is accessed via the gear & wrench icon on the left side of the navigation tab bar.

1) Swipe Left or Right to Choose the Mode:
  • Circuit: Road Course, Circle / Oval, etc.
    Laps around a track where you have a single start/finish point

  • Segment: Autocross, Rally, Drift, etc.
    Point A to Point B courses, with separate start and finish points

  • Drag Race: 1/4 Mile and Others
    Straight-line accelerating from a stop, for a designated track length

  • 4x4 Trail: Low-Speed Crawling
    Records pitch & roll angles on low-speed trails

  • Raw Data: Simple Data Logging
    No timers or GPS start/finish points, just simple data recording

2) Select the Track You're At:
  • Circuit Mode: Tap the "Select Track" button, and either choose the desired track from your list, or add it to your list by tapping on "Add New Track". If start/finish coordinates are not available or not set, you will be given a large on-screen button to press as you cross the start/finish line the first time while recording your session.

  • Segment & 4x4 Trail Modes: Tap the "Select Track" button, and either choose the desired track from your list, or add it to your list by tapping on "Add New Track". Start and finish line coordinates can be set by tapping on "Edit Track", and then using the "Set With GPS or Map" button. If no start line is set, auto-start mode will will start the timer when you accelerate from a stop.

  • Drag Race: Use the drag race control to choose the track length. To switch between Imperial and Metric lengths, tap on the Options gear icon near the upper left of the screen, then see the "Units" selection.


Enhanced GPS, OBD-II, External Camera Control, Live Telemetry, and Other Options

Additional app options and setup for external hardware and services is available by tapping on the Options gear icon near the upper left of the main Setup screen.

  • Storage Location (Android): Choose between Internally-accessible, Externally-accessible, or SD Card storage
    External is default. When using External or SD Card storage, your session files will be accessible from file manager and other apps, and via USB, in the Android/data/com.hptuners.trackaddict/files/ directory

  • Dashboard Display: Set lap timer and data channel displays to be shown when recording a session

  • Alerts: Select which alerts are enabled when on the Record screen. Audible alerts can be muted by tapping on the corresponding flashing red box.

  • OBD: Enables additional data channels from your vehicle via a compatible OBD Interface Device
    RPM, throttle, coolant temperature, and certain other sensors. Also supports basic code scanning and reset.

  • GPS: Choose between Standard location data (via iOS / Android) or Enhanced / Bluetooth mode for a compatible Enhanced GPS Device

  • Auto-Start: Controls if the accelerometer trigger is used to start the timer for Drag Race mode (and Segment & Trail when no start line coordinates are set)
    Using the accelerometer is more precise, but some vehicles or conditions may have false starts when it is used.

  • NBP (Android): Enables additional data channels from a compatible Numeric Broadcast Protocol Device

  • Live Telemetry: Stream your telemetry data while a recording session via Live.RaceRender.com

  • External Camera Control: Acts as a remote control for certain compatible Cameras (GoPro, 360fly, etc)
    Only certain camera models are supported. Footage stays on the camera and is separate from this app's other video features.


Camera & Recording Setup / Preview

Go to the main Camera & Recording Setup screen by tapping on the camera icon that's second from the left side of the navigation tab bar.

Tap on the top left box to select a camera and its recording resolution, or to turn video recording off.

The amount of estimated recording space available is shown when a camera has been selected, based on the current settings and device free space. On Android devices, two lengths may be shown; the first one is the expected length before the recording will be split into multiple pieces, due to Android's 4 GB video size limit.

Landscape orientation (ie horizontal) is required if you want to record video. Vertical videos are intentionally not supported. This camera preview screen will display an interactive camera leveling indicator when your device is rotated to the proper orientation.

The other boxes on the left side are user-configurable dashboard displays. Tap on one of them to view or change its data channel and related settings.


Record a Session

When you are ready to drive, go to the Record screen by tapping on the red dot icon in the center of the navigation tab bar. This screen will then show you its current status and instructions to start.

Keep this app active on the screen while recording. If the app is put into the background or the screen is turned off, your session recording and timing will be less reliable, and it will often block video recording and some other features.

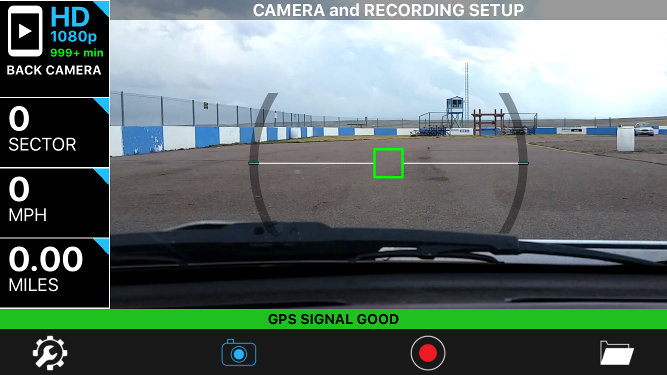
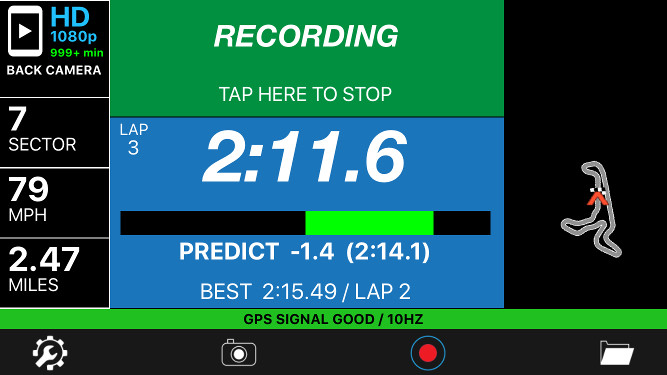
  • Left Panel: This is the same as on the Camera & Recording Setup screen, but will become non-interactive when a recording is in progress.

  • Top Green Box / Recording Status: This displays the recording status and can be tapped on to start or stop the recording.
    • This screen's navigation bar icon will also flash red while a recording is active.

    • Starting a Recording:
      • Once you are on this screen, recording will automatically start once you have a GPS signal and certain other conditions are met. The display will direct you or tell you what it's waiting for.
      • Circuit Mode: Recording will start once the vehicle reaches 10 MPH (16 km/h). This helps avoid wasting recording space when you're just sitting in grid waiting to go out on track. You can also tap on the screen to manually start recording sooner, if desired.
      • Segment, 4x4 Trail, and Drag Modes: Recording will start once the vehicle comes to a stop before, and then timing will begin once you cross the start line (if defined) or start moving. In Segment and Trail modes, you can also tap on the screen to start manually.

    • Stopping a Recording:
      • You can stop the recording by tapping on the screen when it says "Tap Here to Stop".
      • Tapping on a different navigation bar icon is another way to stop the recording.
      • Segment, 4x4 Trail, and Drag Modes: The recording will automatically stop after the vehicle comes to a stop for a while once you have already crossed the finish line.
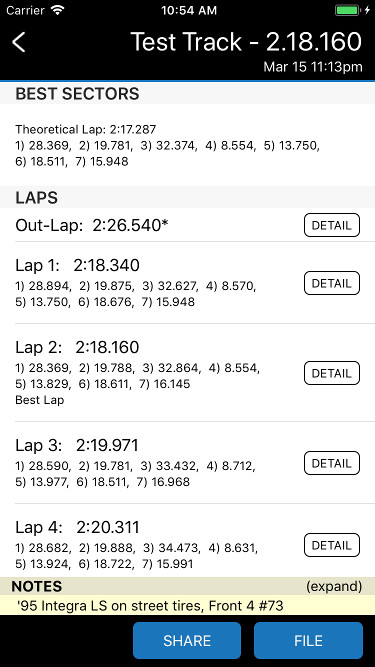
      • Once the recording stops, the app will display the recorded session by default, same as if you had opened it from under the Sessions folder.

  • Bottom Blue Box / Timer & Status: This will show the timer or its status, and may allow you to tap on it to manually start timing or to set a start/finish point, depending on the circumstances.
    • Once timing has begun, a running timer will be displayed. In Circuit mode, this may be replaced by a predicted total lap time (see Circuit Mode info below).

    • Upon completing a lap or run, the total time will flash on the screen.

    • Circuit Mode:
      • You'll typically need a minimum speed of 20 MPH (32 km/h) to trigger the start/finish point and any sector split points for the first lap. This is so that the app can get a valid directional heading to help avoid false triggers on subsequent laps. You can opt to eliminate this speed requirement by editing the track and setting specific headings for each timing point, but these must be within about 30 degrees of actual. (0 = North, 90 = East, 180 = South, 270 = West)

      • The predicted lap time will be displayed when available, and will update every few seconds. The word "Predict" will also be displayed.
        This is based on your current lap performance compared to your best lap so far, and it is available after one full lap has been completed.

      • Target lap time is your theoretical best for this session, based on your best sector times so far.
        This is available when sector split points have been defined for the track and at least one full lap has been completed.

      • Green is used to indicate an improvement in lap time.
        Green Flashing Lap Time = You just ran your best lap so far of this session
        Green Predicted Lap Time = This lap has the potential to be a new best

  • Right Side: The video preview and a track map will be shown here, if applicable.
    The map will appear once you have crossed the start line. No map is shown for Drag Race or Raw Data modes. If using Live Telemetry Streaming and you have chosen to follow other users, their live locations will be indicated here along with yours.

  • Bottom I/O Status Bar: This is the same as on the Camera & Recording Setup screen, but will become non-interactive when a recording is in progress.


View Your Session Data & Video

To view your recorded sessions, tap on the folder icon near the right side of the navigation tab bar. You can then tap on an individual session to open it, or swipe left to delete.

Once a session is opened, it will show your times and other data, depending on the recording mode and other options:
  • 0-60 MPH, 0-100 MPH, etc. will be displayed if you accelerated from a stop at the beginning of the session (typical for Drag Race and some Segment recordings).

  • Theoretical Best Lap Time & Best Sector Times will be displayed for Circuit recordings, when the track that had sector split points defined and multiple complete laps were driven.

  • Sector Times will be displayed below each Lap (Circuit mode) or Run (Segment & Trail), when the track had sector split points defined.
    • A 0.000 sector time typically indicates that a sector split trigger was missed, which can indicate a GPS problem, an incorrect sector split point for the course configuration, or that the sector split points were driven in reverse order or out of order.
    • The fastest sector times of the session will be displayed in bold or underlined text.

  • Drag Race recordings will show the completed run time for the selected track length, with each timing split and trap speed below it (330', 1/8 mile, 1000', 1/4 mile, etc.)

How To:
  • Analyze a Lap / Run & View Data Graphs: Tap on its "Detail" button. This screen enables you to view and compare data statistics, graphs, and map displays. Tap on the configuration gear icon near the top right for more options.

  • Play & Export Video: Tap on the laps to select the desired range (these must be consecutive laps; no gaps), and then tap on the "Video" button. You will then be offered some data overlay configuration options, as well as an Export button at the bottom right. The "Video" button is only available when video was recorded on your device for the session, and does not apply to External Camera Control.

  • Export Data: Tap on the "Share" button, and choose "Send Data File", then you can choose CSV, GPX, KML, or VBO format. For more detail on those, please see the Interoperability page under "Data Analysis". The "WiFi Transfer" and "USB File Sharing" options are typically used if you're wanting to send data to another TrackAddict user or to RaceRender.

  • Rename / Delete / Move: Tap on the "File" button for these options.

  • Move Multiple Files to Your Computer: Please see USB File Transfer.